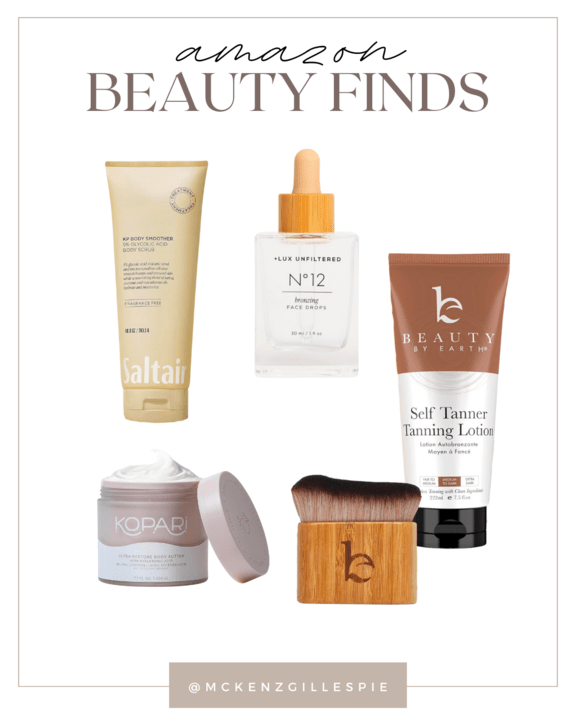
There’s something about a sun-kissed glow that turns heads and lights up any room. For many women, tanning is more than a beauty regimen; it’s a way to feel confident and project a healthy, relaxing vibe. Yet, not all of us have the time or luxury to spend endless hours at the beach or visit tanning salons. That’s where mastering the art of self-tanning comes in. Today I’m sharing my self-tanning routine and the tanning products that I swear by so you, too can easily get that perfect fake tan from the comfort of your own home!

Self Tanning Routine

Step 1: Exfoliate
The first step to any successful self-tanning experience is to prepare by removing dead skin. I like to exfoliate my skin thoroughly the night before I plan to tan to remove any dead skin cells. I focus on rough areas like my elbows, knees, and ankles. The key is not to scrub too hard because excessive exfoliation can leave your skin irritated and prone to uneven tanning.
Step 2: Apply Body Butter
Hydration is key, especially for dry areas that can absorb too much tanner and become darker than the rest of your body. Applying body butter or a thick body lotion to these spots acts as a barrier, ensuring that your tan develops evenly.
I like to focus on my elbows, knees, and ankles. The body butter forms a protective layer, ensuring these spots won’t grab too much product and become overly tanned. Don’t skip areas like your wrist and in between your fingers, as these spots are also more prone to getting splotchy.
Step 3: Apply Self Tanner to Body
When applying self-tanner, start at your ankles and work your way up using smooth, circular motions. I like to use a tanning mitt to protect my hands and create an even tan. A gradual tanning lotion or tanning mousse is perfect for beginners, creating a color that develops over time. For more experienced tanners, an instant tan gives a quick, bold appearance.
Start with a dime-sized amount for each section of the body. It’s always easier to add more than to remove excess. Ensure you’re in a well-lit room and apply sparingly around areas you don’t want to darken, such as your knuckles and the soles of your feet.
Step 4: Blend
Blending out self-tanner ensures that the application is undetectable and gives a natural appearance. Focus on making sure there are no harsh lines or over-applied spots. A blending brush is my favorite method for this step. For hard-to-reach areas like your back enlist the help of a friend or partner to help.
Step 5: Tan Face
Facial skin is more sensitive and typically exfoliates more often than the skin on the rest of the body. That is why I like to use a self-tanner specifically designed for the face as well as a separate brush to avoid irritation. I personally love these Lux Unfiltered face drops and always recommend them as one of my summer makeup must-haves.

Step 6: Wash Hands
Your hands can give away a tanned secret quicker than you think. Self-tanner can cling to the palms and under the fingers, creating an unnatural hue. Wash your hands thoroughly with soap and water, paying extra attention to the creases and under your nails. A nail brush can be particularly helpful in removing any tanner residue. Quickly wash the tops of your hands to reduce the chances of them getting stained as well.
Step 7: Allow Skin to Dry
Wet skin can dilute self-tanner and cause streaking. Waiting for your skin to dry ensures that you won’t rub off any tanner prematurely and that it will fully absorb and develop into a beautiful, bronzed glow. Give your tan at least 10-15 minutes to dry. Avoid tight clothing and practice patience—this is where the majority of mishaps occur from impatience and rushing the process.
Step 8: Hydrate Skin
Hydrated skin maintains your tan longer. Dry skin exfoliates more rapidly, meaning that your tan will fade more quickly if you don’t moisturize consistently.
Use a light, fragrance-free moisturizer or a tan extender to keep your skin supple and your tan fresh. Apply twice daily, especially after showering, to prolong the life of your tan.
With these eight steps, you’re well on your way to achieving the perfect self-tanning routine. Remember, practice makes perfect. Each tanning session is a chance to refine your skills and develop a routine that fits your unique needs. Enjoy the process of nourishing your skin and reveling in the radiance of a sunless tan that’s both healthy and beautiful. Go forth and glow, goddess!


No Comments